My old 1024 bits key is dead, please use 0xAC6B43FE

-----BEGIN PGP SIGNED MESSAGE-----
Hash: SHA256

Hi,

I am not using my old GPG key, 0x98EF9A49 anymore. My new key, using
4096 SHA2 256,
with fingerprint:

A0B1 A9F3 5089 5613 0E7A  425C D416 AD15 AC6B 43FE

has replaced the old one in the Debian keyring. Please don't encrypt
message to me using the old key anymore.

Since the idea is that we shouldn't trust 1024 bits keys anymore, I'm
not signing this message with the old key, but only with the new one,
which has gathered enough signatures from Debian Developers (more than a
dozen).

Thomas Goirand (zigo)
-----BEGIN PGP SIGNATURE-----
Version: GnuPG v1.4.12 (GNU/Linux)

iQIcBAEBCAAGBQJSVC02AAoJENQWrRWsa0P+3wAP/i2ORGgXMoQVtjoUNX+x/Ovz
yoNSLztmih4pOLw9+qHJfM+OkBKUPwrkyjgBWkwD2IxoM2WRgNZaY5q/jBEaMVgq
psegqAm99zkX0XJTIYfqwOZFA1JLWMi1uLJQO71j0tkJWPzBSa6Jhai81X89HKgq
PqQXver+WbORHkYGIWwBvwj+VbPZ+ssY7sjbdWTaiMcaYjzLQR4s994FOFfTWH8G
5zLdwj+lD/+tBH90qcB9ETlbSE1WG4zBwz5f4++FcPYVUfBPosE/hcyhIp6p3SPK
8F6B51pUvqwRe52unZcoA30gEtlz+VNHGQ3yF3T1/HPlfkyysAypnZOw0md6CFv8
oIgsT+JBXVavfxxAJtemogyAQ/DPBEGuYmr72SSav+05BluBcK8Oevt3tIKnf7Q5
lPTs7lxGBKI0kSxKttm+JcDNkm70+Olh6bwh2KUPBSyVw0Sf6fmQdJt97tC4q7ky
945l42IGTOSY0rqdmOgCRu8Q5W1Ela9EDZN2jPmPu4P6nzqIRHUw3gS+YBeF1i+H
/2jw4yXSXSYQ+fVWJqNb5R2raR37ytNWcZvZvt4gDxBWRqnaK+UTN6tdF323HKmr
V/67+ewIhFtH6a9W9mPakyfiHqoK6QOyOhdjQIzL+g26QMrjJdOEWkqzvuIboGsw
OnyYVaKsZSFoKBs0kOFw
=qjaO
-----END PGP SIGNATURE-----

Why using Mailman when MLMMJ is available?

Daniel Pocock just wrote a blog post about how to setup mailman for virtual hosting. Well, it strikes me that mailman is a bad solution, for many reasons. First, it imposes you to use @lists.example.com lists instead of @example.com. I’m not sure if that is mandatory, but at least I’ve seen only mailman setups done this way. At least, it is how mostly everyone does the setup. I think that’s really ugly. Any mailbox should be fine, IMO.

What I found particularly lame about Mailman, is that these issues (plus the ones which Daniel listed) have been known for YEARS, though nobody came up with a patch to fix it. And it’s really not hard. Why do I know it? Well, because I’ve been using MLMMJ for years without such troubles. The current situation where everyone is with mailman is really LAME.

Not only MLMMJ is better because it is easier to install and supports virtual hosting out of the box, but also it is written in C and is much faster than Mailman. MLMMJ has been used in high traffic lists like for SUSE and Gentoo. The fact that some major sites decided to do the switch isn’t a proof that MLMMJ is perfect, but is a good indication that it at least works well without too much trouble.

Also, with mailman, you have to use the subject lines to control your list subscriptions and send command to it. No need to do that with MLMMJ, because everything is controled with the mailbox extension. For example, mylist+subscribe@example.com can be used to subscribe (instead of mylist-requests@lists.example.com, then fill-in the subject line with mailman).

So, if you don’t like some of the (bad) limitations of Mailman, would like to test something faster, and easier to setup, have a try with MLMMJ (see mlmmj.org for more details, and see the README.Debian inside my package).

OpenStack Havana b2 available, openstack-debian-images approved

I have finished preparing the beta 2 of the next release of OpenStack. It is currently only available from out Git on Alioth (in /git/openstack), and directly from my jenkins repository, which creates Wheezy backports for it:

deb ftp://havana.pkgs.enovance.com/debian havana main
deb http://archive.gplhost.com/debian havana-backports main

As for every OpenStack release, a large number of Python modules needed to be packaged and are waiting in the FTP master NEW queue to be approved: oslo-sphinx, python-django-discover-runner, python-hacking, python-jsonrpclib, python-lesscpy, python-neutronclient, python-nosehtmloutput, python-requestbuilder, python-termcolor, sphinxcontrib-httpdomain and sphinxcontrib-pecanwsme. Let’s hope that they will be approved before the next beta release in september (time where OpenStack Havana will be in feature freeze). The total number of packages maintained by the OpenStack team (on which I really am the only active maintainer for the moment…), there’s 53 packages, plus these 11 packages waiting in the NEW queue. That’s a big number of package, and I wouldn’t mind some help…

One thing that annoyed all the community is that Quantum, the OpenStack network virtualization module, had to be renamed as Neutron, because of a trademark from Quantum (you probably remember the Quantum Fireball hard drives? Well, it’s the same company…).

Another good news is that my openstack-debian-images package has just been approved and landed in Sid. With it, you can automate the process of building a Debian image for OpenStack with a simple shell command (there’s a man page that I wrote with it: read it if you need to build images). It is made of a single shell script to build the image, using kpartx, parted, mbr, debootstrap, extlinux and friends. I tried to keep it simple, not involving a huge amount of components.

With the release of cloud-init 0.7.2-3, I have fixed a few bugs (3 important bugs, out of which 2 where RC bugs), thanks to contributions in the debian-cloud@lists.debian.org mailing list. This includes adding new init.d scripts, so we now have support for user data. This doesn’t only benefits OpenStack images, but anyone willing to start virtual machines in the cloud (nowadays, every cloud implementation needs cloud-init installed in the virtual images). This means you can include a script in the metadata of the virtual machine you start it, and it will be executed at startup. If everything goes as planned (that is, no new RC bug), I will upload an update of cloud-init to backports in 5 days (there is already a version there, but it doesn’t have the necessary init.d scripts to execute the user data scripts), and openstack-debian-images in 9 days. Then it will be possible to build OpenStack images with absolutely all the tools available from Wheezy (and backports). I hope to be able to discuss that during Debconf 13.

The “v” sikness is spreading

It seems to be a new fashion. Instead of tagging software with a normal version number, many upstream adds a one letter prefix. Instead of version 0.1.2, it becomes version v0.1.2.

This sickness has spread all around in Github (to tell only about the biggest one), from one repository to the next, from one author to the next. It has consequences, because Github (and others) conveniently provides tarballs out of Git tags. Then the tarball names becomes packagename-v0.1.2.tar.gz instead of package packagename-0.1.2.tar.gz. I’ve even seen worse, like tags called packagename-0.1.2. Then the tarball becomes packagename-packagename-0.1.2. Consequently, we have to go around a lot of problems like mangling in our debian/watch files and so on (probably the debian/gbp.conf if you use that…). This is particularly truth when upstream doesn’t make tarball and only provides tags on github (which is really fine to me, but then tags have to be made in a logical way). Worse: I’ve seen this v-prefixing disease as examples in some howtos.

What’s wrong with you guys? From where is coming this v sickness? Have you guys watch too much the v 2009 series on TV, and you are a fan of the visitors? How come a version number isn’t just made of numbers? Or is this just a “v” like the virus of prefixing release names with a “v”?

So, if you are an upstream author, reading debian planet, with your software packaged in Debian, and caught the bad virus of prefixing your version numbers with a v, please give-up on that. Adding a “v” to your tags is meaningless anyway, and it’s just annoying us downstream.

Edit: Some people pointed to me some (IMO wrong) reasons why to prefix version numbers. My original post was only half serious, and responding with facts and common sense breaks the fun! :) Anyway, the most silly one being that Linus has been using it. I wont comment on that one, it’s obvious that it’s not a solid argumentation. Then the second one is for tab completion. Well, if your bash-completion script is broken, fix it so that it does what you need, rather than going around the problem by polluting your tags. Then the 3rd argument was if you were merging 2 repositories. First this never happened to me to merge 2 completely different repos, and I very much doubt that this is an operation that you have to do often. Second, if you merge the repositories, the tags are loosing all meanings, and I don’t really think you will need them anyway. Then the last one would be working with submodules. I haven’t done it, and that might be the only case where it makes sense, though this has nothing to do with prefixing with “v” (you would need a much smarter approach, like prefixing with project names, which in that case makes sense). So I stand by my post: prefixing with “v” makes no sense.

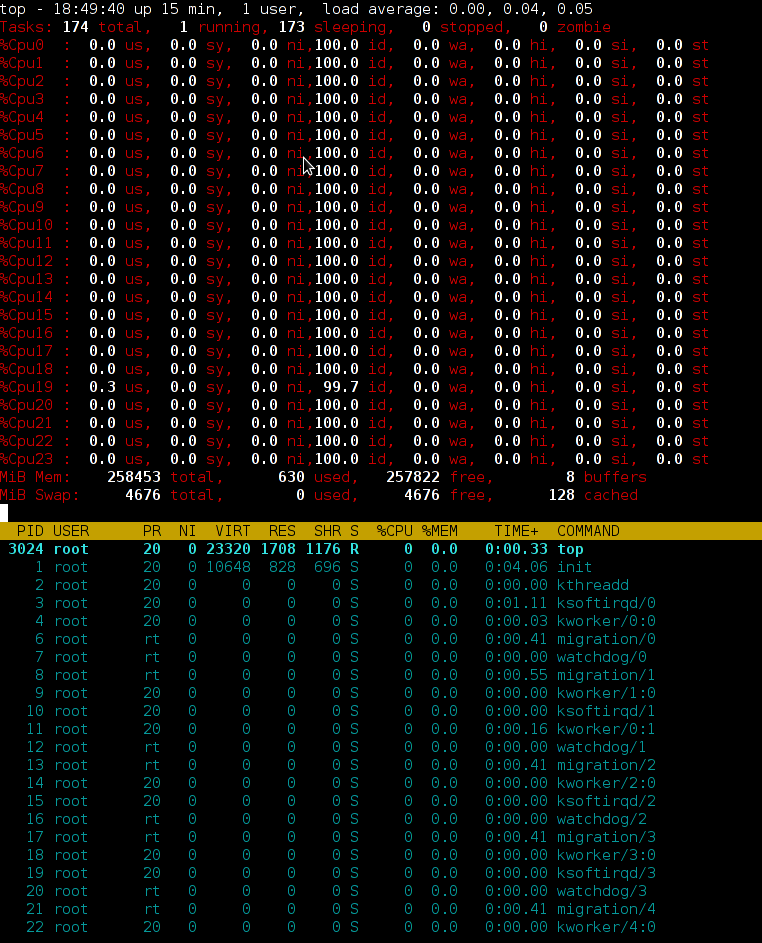
Compute node with 256 GB of RAM, 2CPU with 6 cores each (24 threads total)

Will that be enough? Let’s load some VMs in that beast! :)

too_much_ram_and_cpu

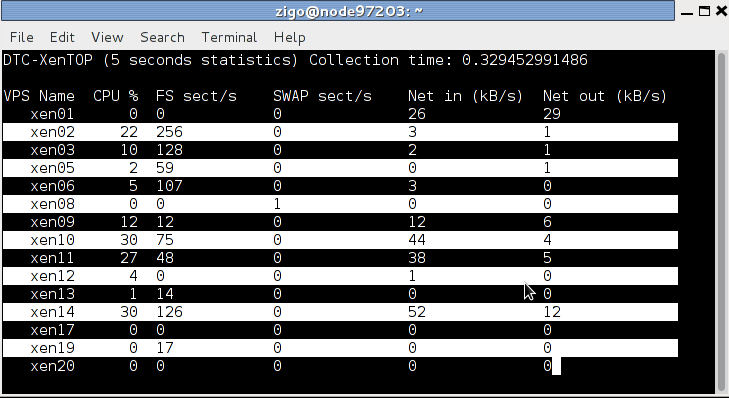
dtc-xentop: monitoring of CPU, I/O and network for your Xen VMs

What has always been annoying me with Xen, is that xentop is… well … a piece of shit! It just displays the current numbers of sectors or network bytes read / write. But as an administrator, what you care about, is to know which of your VM is taking all the resources, making your whole server starve. The number of sectors read/write since the VM has started is of very low importance. What you care about is to have an idea of the current transfer rate. And the same apply for networking.

So, tonight, within few hours, I hacked a small python shell script using ncurses to do what I needed, which tells how much resources have been used over the last 5 seconds (and not since the VM started). This way, it is easy to know which VM is killing your server.

dtc-xentop

The script is adapted to my own needs only. Which means that it works only for DTC-Xen VMs of GPLHost. In my case, VM uses exactly 2 partitions, one for the filesystem, and one for the swap, which means that I display exactly that. I’m sure it wouldn’t be hard to adapt it so that it would work for all cases (which would mean finding out what device uses a VM and getting the statistics from /sys using that information, instead of determining it using the name of the VM). But I don’t need it, so the script will stay this way.

Before writing this tonight, I didn’t know ncurses. Well, it’s really not hard, especially in Python! It took me about 2 hours to write^Whack the script (cheating on the dtc-xen soap server which I already had available).

Jenkins: building debian packages after a “git push” (my 2cents of a howto)

The below is written in the hope it will be helpful for my fellow DDs.

Why using “build after push”?

Simple answer: to save time, to always use a clean build environment, to automate more tests.

Real answer: because you are lazy, and tired of always having to type these build commands, and that watching the IRC channel is more fun than watching the build process.

Other less important answers: building takes some CPU time, and makes your computer run slower for other tasks. It is really nice that building doesn’t consume CPU cycles on your workstation/laptop, and that a server does the work, not disturbing you while you are working. It is also super nice that it can maintain a Debian repository for you after a successful build, available for everyone to use and test, which would be harder to achieve on your work machine (which may be behind a router doing NAT, or even sometimes turned off, etc.). It’s also kind of fun to have an IRC robot telling everyone when a build is successful, so that you don’t have to tell them, they can see it and start testing your work.

Install a SID box that can build with cowbuilder

  • Setup a SID machine / server.
  • Install a build environment with git-buildpackage, pbuilder and cowbuilder (apt-get install all of these).
  • Initialize your cowbuilder with: cowbuilder –create.
  • Make sure that, outside of your chroot, you can do ./debian/rules clean for all of your packages, because that will be called before moving to the cowbuilder chroot. This means you have to install all the build-dependencies involved in the clean process of your packages outside the base.cow of cowbuilder as well. In my case, this means “apt-get install openstack-pkg-tools python-setuptools python3-setuptools debhelper po-debconf python-setuptools-git”. This part is the most boring one, but remember you can solve these problems when you see them (no need to worry too much until you see a build error).
  • Edit /etc/git-buildpackage/gbp.conf, and make sure that under [DEFAULT] you have a line showing builder=git-pbuilder, so that cowbuilder is used by default in the system when using git-buildpackage (and therefore, by Jenkins as well).

Install Jenkins

WARNING: Probably, before really installing, you should read what’s bellow (eg: Securing Jenkins).

Simply apt-get install jenkins from experimental (the SID version has some security issues, and has been removed from Wheezy, on a request of the maintainer).

Normally, after installing jenkins, you can access it through:

http://<ip-of-your-server>:8080/

There is no auth by default, so anyone will be able to access your jenkins web GUI and start any script under the jenkins user (sic!).

Jenkins auth

Before doing anything else, you have to enable Jenkins auth, otherwise, you have everything accessible from the outside, meaning that more or less, anyone browsing your jenkins server could be allowed to run any command. It might sound simple, but in fact, Jenkins auth is tricky to activate, and it is very easy to get yourself locked out, with no working web access. So here’s the steps:

1. Click on “Manage Jenkins” then on “Configure system”

2. Check the “enable security” checkbox

3. Under security realm select “Jenkins’s own user database” and leave “allow users to sign up”. Important: leave “Anyone can do anything” for the moment (otherwise, you will lock yourself out).

5. At the bottom of the screen, click on the SAVE button.

6. On the top right, click to login / create an account. Create yourself an account, and stay logged in.

7. Once logged-in, go back again in the “Manage Jenkins” -> “Configure system”, under security.

8. Switch to “Project based matrix authentication strategy”. Under “User/group to add”, enter the new login you’ve just created, and click on “Add”.

9. Select absolutely all checkboxes for that user, so that you make yourself an administrator.

10. For the Anonymous user, for Job, check Read, Build and Workspace. For “Overall” select Read.

11. At the bottom of the screen, hit save again.

Now, anonymous (eg: not logged-in) users should be able to see all projects, and be able to click on the “build now” button. Note that if you lock yourself out, the way to fix is to turn off Jenkins, edit config.xml, remove the “useSecurity” thing, and all what is in “authorizationStragegy” and “securityRealm”, then restart Jenkins. I had to do that multiple times until I had it right (as it isn’t really obvious you got to leave Jenkins completely insecure when creating a new user).

Securing Jenkins: Proxy Jenkins through apache to use it over SSL

When doing a quick $search-engine search, you will see lots of tutorials to use apache as a proxy, which seems to be the standard way to run Jenkins. Add the following to /etc/apache2/sites-available/default-ssl:

ProxyPass / http://localhost:8080/
ProxyPassReverse / http://localhost:8080/
ProxyRequests Off

Then perform the following commands on the shell:

htpasswd -c /etc/apache2/jenkins_htpasswd <your-jenkins-username>
a2enmod proxy
a2enmod proxy_http
a2enmod ssl
a2ensite default-ssl
a2dissite default
apache2ctl restart

Then disable access to the port 8080 of jenkins from outside:

iptables -I INPUT -d <ip-of-your-server> -p tcp --dport 8080 -j REJECT

Of course, this doesn’t mean you shouldn’t take the steps to activate Jenkins own authentication, which is disabled by default (sic!).

Build a script to build packages in a cowbuilder

I thought it was hard. In fact it was not. All together, this was kind of fun to hack. Yes hack. What I did yet another kind of 10km ugly shell script. The way to use it is simply: build-openstack-pkg <package-name>. On my build server, I have put that script in /usr/bin, so that it is accessible from the default path.Ugly, but it does the job!

Jenkins build script for openstack

At the end of the script, scan_repo() generates the necessary files for a Debian repository to work under /home/ftp. I use pure-ftpd to serve it. /home/ftp must be owned by jenkins:jenkins so that the build script can copy packages in it.

This build script is by no mean state of the art, and in fact, it’s quite hack-ish (so I’m not particularly proud of it, but it does its job…). If I am showing it in this blog post, it is just to show an example of what can be done. It is left as an exercise to the reader to create another build script adapted to its own needs, and write something cleaner and more modular.

Dependency building

Let’s say that you are using the Built-Using: field, and that package B needs to be built if package A changes. Well, Jenkins can be configured to do that. Simply edit the configuration of project B (you will find it, it’s easy…).

My use case: In my case, for building Glance, Heat, Keystone, Nova, Quantum, Cinder and Ceilometer, which are all components of Openstack, I have written a small (about 500 lines) library of shell functions, and an also small (90 lines) Makefile, which are packaged in “openstack-pkg-tools” (so Nova, Glance, etc. all build-depends on openstack-pkg-tools). The shell functions are included in each maintainer scripts (debian/*.config and debian/*.postinst mainly) to avoid having some pre-depends that would break debconf flow. The Makefile of openstack-pkg-tools is included in debian/rules of each packages.

In such a case, trying to manage the build process by hand is boring and time consuming (spending your time watching the build process of package A, so that you can manually start the build of package B, then wait again…). But it is also error prone: it is easy to do a mistakes in the build order, you can forget to dpkg -i the new version of package A, etc.

But that’s not it. Probably at some point, you will want Jenkins to rebuild everything. Well, that’s easy to do. Simply create a dummy project, and have other project to build after that one. The build steps could simply be: echo “Dummy project” as a shell script (I’m not even sure that’s needed…).

Configuring git to start a build on each push

In Jenkins, pass your mouse over the “Build now” URL. Well, we just need to wget that URL in your Alioth repository. A small drawing is better than long explanation:

for i in `ls /git/openstack` ; do
    echo "wget -q --no-check-certificate \
    https://<ip-of-your-server>/job/${PROJ_NAME}/build?delay=0sec \
    -O /dev/null" >/git/openstack/${i}/hooks/post-receive \
        && chmod 0770 /git/openstack/${i}/hooks/post-receive;
done

The chmod 0770 is necessary if you don’t want every Alioth users to have access to your Jenkins server web interface and see an eventual htpassword protection that you can add to your jenkins box (I’m not covering that, but it is fairly easy to add such protection). Note that all of the members of your Alioth group will then have access to this post-receive hook, containing the password of your htaccess, so you must trust everyone in your Alioth group to not do nasty things with your Jenkins.

Bonus point: IRC robot

If you would like to see the result of your build “published” on IRC, Jenkins can do that. Click on “Manage Jenkins”, then on “Manage Plugins”. Then click on “available” and check the box in front of “IRC plugin”. Go at the bottom of the screen and click on “Add”. Then check the box to restart Jenkins automatically. Once it is restarted, go again under “Manage jenkins” then “Configure system”. Select the “IRC Notification” and configure it to join the network and the channel you want. Click on “Advanced” to select the IRC nick name of your bot, and make sure you change the port (by default jenkins has 194, when IRC normally uses 6667). Be patient when waiting for the IRC robot to connect / disconnect, this can take some time.

Now, for each jenkins Job, you can tick the “IRC Notification” option.

Doing piuparts after build

One nice thing with automated builds, is that most of the time, you don’t need to wait starring at them. So you can add as many tests as you want, the Jenkins IRC robot will anyway let you know sooner or later the result of your build. So adding piuparts tests in the build script seems the correct thing to do. Though that is still on my todo, so maybe that will be for my next blog post.
Git packaging workflow

Seeing what has been posted recently in planet.d.o, I would like to share as well my thoughts and work-flow, and tell that I do agree with Joey Hess on many of his arguments. Especially when he tells that Debian fetishises upstream tarballs. We’re in 2013, at the age of Internet, and more and more upstream authors are using Git, and more and more they don’t care about releasing tarballs. I’ve seen some upstream authors who simply stopped doing so completely, as a Git tag is really enough. I also fully agree than disk space and network speed isn’t much of a problem these days.

When there are tags available, I use the following debian/gbp.conf:

[DEFAULT]
upstream-branch = master
debian-branch = debian
upstream-tag = %(version)s
compression = xz

[git-buildpackage]
export-dir = ../build-area/

On many of my packages, I now just use Git tags from upstream if they are available. To make it more easy, I now nearly always use the following piece of code in my debian/rules files:

DEBVERS         ?= $(shell dpkg-parsechangelog | sed -n -e 's/^Version: //p')
VERSION         ?= $(shell echo '$(DEBVERS)' | sed -e 's/^[[:digit:]]*://' -e 's/[-].*//')
DEBFLAVOR       ?= $(shell dpkg-parsechangelog | grep -E ^Distribution: | cut -d" " -f2)
DEBPKGNAME      ?= $(shell dpkg-parsechangelog | grep -E ^Source: | cut -d" " -f2)
DEBIAN_BRANCH   ?= $(shell cat debian/gbp.conf | grep debian-branch | cut -d'=' -f2 | awk '{print $1}')
GIT_TAG         ?= $(shell echo '$(VERSION)' | sed -e 's/~/_/')

get-upstream-sources:
        git remote add upstream git://git.example.org/proj/foo.git || true
        git fetch upstream
        if ! git checkout master ; then \
                echo "No upstream branch: checking out" ; \
                git checkout -b master upstream/master ; \
        fi
        git checkout $(DEBIAN_BRANCH)

make-orig-file:
        if [ ! -f ../$(DEBPKGNAME)_$(VERSION).orig.tar.xz ] ; then \
                git archive --prefix=$(DEBPKGNAME)-$(GIT_TAG)/ $(GIT_TAG) | xz >../$(DEBPKGNAME)_$(VERSION).orig.tar.xz ; \
        fi
        [ ! -e ../build-area ] && mkdir ../build-area || true
        [ ! -e ../build-area/$(DEBPKGNAME)_$(VERSION).orig.tar.xz ] && cp ../$(DEBPKGNAME)_$(VERSION).orig.tar.xz ../build-area || true

Packaging a new upstream VERSION now means that I only have to edit the debian/changelog, do ./debian/rules get-upstream-source so that I get new commits and tags, then “git merge -X theirs VERSION” to import the changes, then finally invoke ./debian/rules make-orig-file to create the orig.tar.xz. My debian branch is now ready for git-buildpackage. Note that the sed with the GIT_TAG thing is there because unfortunately, Git doesn’t support the ~ char in tags, and that most of the time, upstream do not use _ in version numbers. Let’s say upstream is releasing version 1.2.3rc1, then I simply do “git tag 1.2.3_rc1 1.2.3rc1” so that I have a new tag which points to the same commit as 1.2.3rc1, but that can be used for the Debian 1.2.3~rc1-1 release and the make-orig-file.

All this might looks overkill at first, but in fact it is really convenient and efficient. Also, even though there is a master branch above, it isn’t needed to build the package. Git is smarter than this, so even if you haven’t checked out upstream master branch from the “upstream” remote, make-orig-file and git-buildpackage will simply continue to work. Which is cool, because this means you can store a single branch on Alioth (which is what I do).

An afternoon of fun hacks, booting Debian

Step one: building OpenRC, and force it with a big hammer to replace sysv-rc.

openrc

A few minutes later, with even more hacks, we have a more decent boot process which uses Gentoo boot scripts (amazingly, most of them do work out of the box!):

openrc_take2

Notice the udev script, which is hacked from the Debian sysv-rc, still has the color scheme of Debian, while the other scripts are just drop-ins from Gentoo.

Of course, this is only a big hack to have the above. There is only so much you can do in a 4 hours hacking session. It will need more serious work to make it a viable solution (like finding a way to upgrade smoothly and allow the first reboot to shutdown processes which aren’t running using cgroup, converting existing init scripts automatically, hooking into update-rc.d, etc.). Though the proof of concept is there: the “rc-status” command works, we have cgroups working, and so on.

Thanks to Patrick Lauer for spending with me this fun afternoon, hacking OpenRC in SID.

Openstack Grizzly (2013.1~g3) available

This post is just a status update for the Openstack packaging, after the next version froze last week.

The Openstack bi-annual summit of next April will take place this year in Portland, Oregon, and if everything goes as plan, Grizzly will be released just before the summit. Grizzly will be out a bit before the next Ubuntu in April, as releases are following the one of Ubuntu. Openstack uses town names for it’s release names: Austin, Bextar, Cactus (2011.1), Diablo (2011.2), Essex (2012.1), Folsom (2012.2), Grizzly (2013.1).

I started to seriously work on the Openstack packaging in October, and never stopped working on its packaging until now. Slowly, but surely, preparing all the packages and their dependency python modules. One package at a time, working all this every day. Folsom works now pretty well and can be used in production, and I maintain it for security (along with Essex, which is in Wheezy).

Then Grizzly was frozen last week, on the 22nd of February, with the “G3” release. As I already worked on packaging the “G2” release in January, managing the packaging of “G3” was fast. On late Sunday, I had a repository with Grizzly built, and its corresponding python (build-)dependencies. But while just building your own repository is easy, having all the dependencies in Debian is a lot more work.

As of today, if I include all the python modules, I have (at least) touch around 50 packages in total when working on Openstack. Many of them were simply built from scratch. The only python dependency that needs an upgrade in Experimental, so that all dependencies are satisfied, is a new version of pep8. The rest of is new python modules that were not in Debian, and which are currently waiting in the NEW queue for ftp masters approval: python-pecan, python-tablib, python-wsme and websockify. Some of these python modules have been waiting there for a long time, like python-pecan (it’s been waiting in the NEW queue for more than 35 days now), some like websockify and python-wsme have been uploaded only this week. I really hope it can be possible to have all of Grizzly in Debian before the next Openstack summit (this depends mainly on the ftp-masters).

Note that I do not intend to apply security patches in Grizzly until it is released as the new Openstack stable. So use my private Grizzly repository as your own risk. I intend to fix this by working on some constant integration to have nightly builds, like many people are doing with Openstack. If you want to try it out:

deb http://archive.gplhost.com/debian grizzly main